Generating one impressive AI image or video shot is no longer the difficult part. The real challenge begins when the same character must appear in a close-up, a profile shot, a wide scene, and a moving sequence without becoming a slightly different person each time.
A face changes. A jacket gains a new collar. Eye color drifts. A distinctive scar disappears. Lighting and lens choices stop matching. Each shot may look attractive on its own, but the sequence fails because the audience no longer believes it belongs to the same world.
That is why AI character consistency has become one of the most important skills in cinematic AI production.
The solution is not a single “perfect prompt.” It is a controlled workflow that separates permanent identity information from variables such as camera angle, action, location, and lighting. Multi-view identity locking, structured prompt engineering, and shot-by-shot validation work together to reduce drift and create footage that can survive an edit.
## What Is Multi-View Identity Locking?
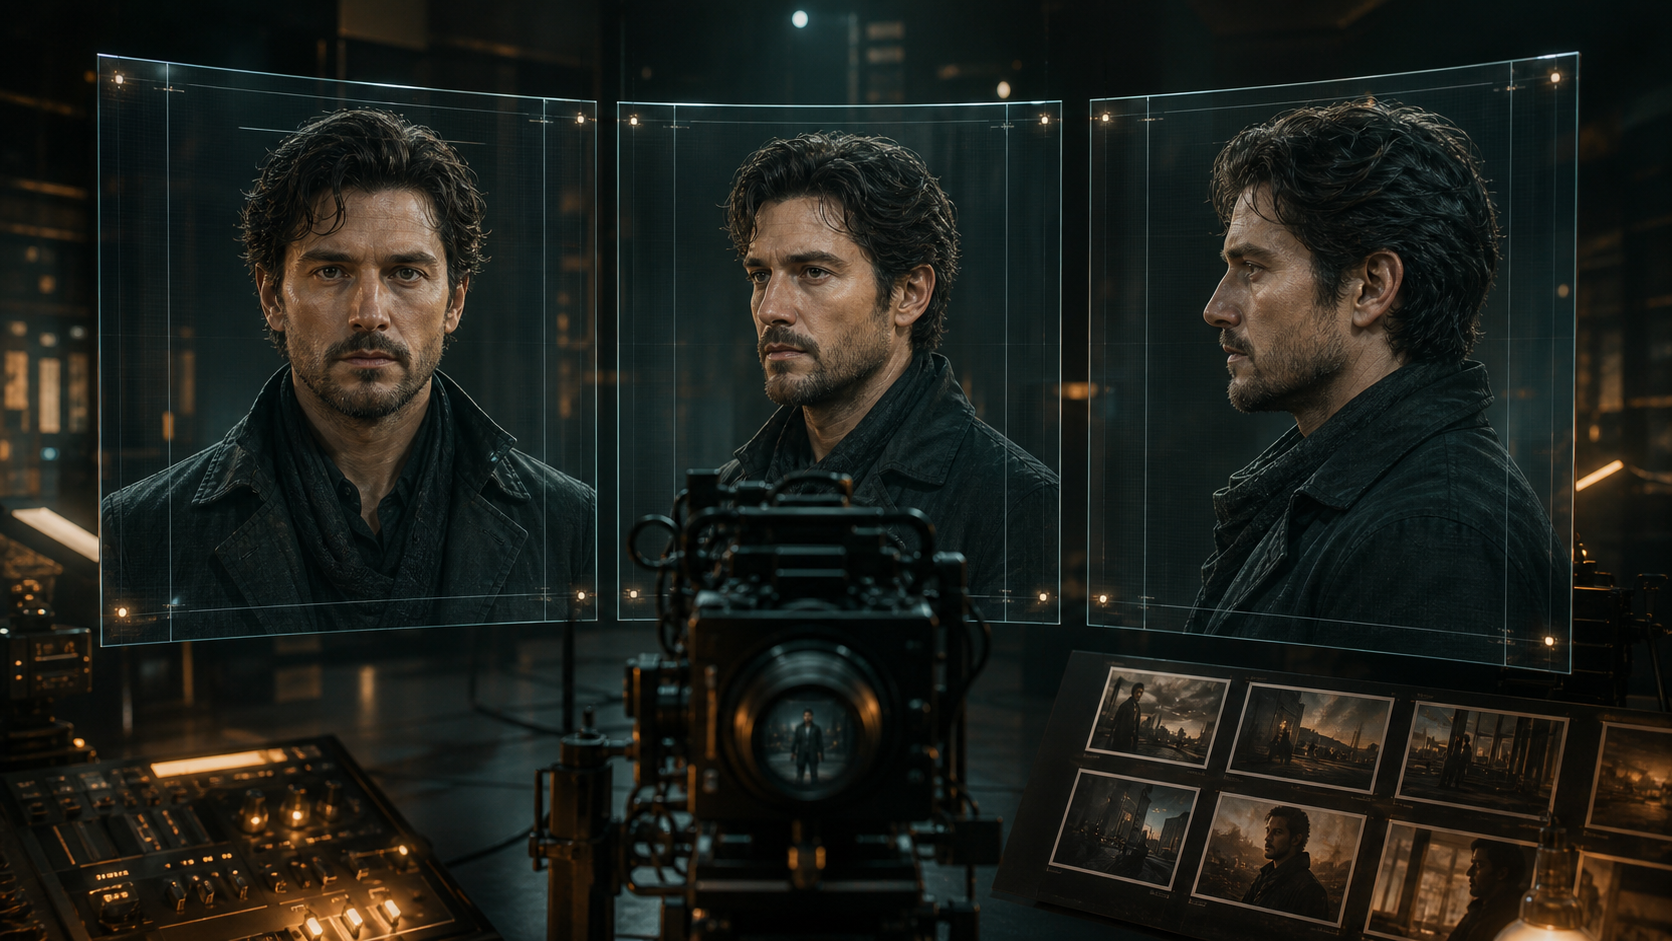
Multi-view identity locking is a practical method for maintaining a character across generated shots by supplying consistent reference images from several angles. A typical reference set includes:
– Front view.
– Three-quarter view.
– Left or right profile.
– Full-body view when clothing and proportions matter.
The goal is to give the model information it cannot infer reliably from one image. A frontal portrait does not fully describe the nose profile, ear shape, hair volume, or how clothing fits from the side. When the camera moves, a model may invent those missing details.
Multiple references reduce that uncertainty.
The word “locking” should not be interpreted as a universal technical guarantee. Different models and platforms use references differently, and complex motion can still create variation. It is better to think of identity locking as a disciplined process for reducing drift.
## Build an Identity Bible Before Writing the First Scene
Many creators begin with a long cinematic prompt. A stronger workflow begins with a character specification.
Create a short identity bible that defines visible traits the model can reproduce:
– Approximate age range.
– Face shape and proportions.
– Eye color and eyebrow shape.
– Hair color, length, and style.
– One or two distinctive features.
– Core wardrobe and materials.
– Height and body proportions.
– A neutral expression for reference generation.
Choose a limited number of strong signals. Ten subtle details compete for attention, while five clear details are easier to preserve.
Avoid contradictory descriptions. Phrases such as “soft childlike features with a sharply aged face” may sound expressive, but they give the model conflicting instructions. Identity prompts should be visual and verifiable.
Once the design is approved, stop redesigning it. Treat the selected image as a production asset.
## How to Create a Multi-View Character Reference
The best reference sheet is neutral, clear, and consistent.
Use the same:
– Hairstyle.
– Clothing.
– Accessories.
– Background.
– Lighting direction.
– Camera height.
– Expression.
Generate or photograph the character from the front, three-quarter angle, and profile. Add a full-body image if the project includes walking, action, or wide shots.
Avoid dramatic lenses, heavy shadows, face-covering hair, sunglasses, motion blur, and extreme expressions. Those choices may be appropriate in the final film, but they hide useful identity information in the reference stage.
Examine the images closely. Compare the jaw, nose, ears, hairline, eyes, shoulders, and clothing details. If one view is noticeably different, remove it. A bad reference can create more inconsistency than a missing reference.
## The Seven Layers of a Strong Cinematic AI Prompt
A useful video prompt describes a shot as a set of production decisions. It does not need to read like a screenplay or a poem.
### 1. Identity Reference
Begin by identifying the approved character reference. If the tool lets you name or tag reference media, use the same name in every shot.
Do not repeatedly rewrite the character’s face in different language. The reference should carry most of the identity information. Add text only when a defining feature needs reinforcement.
### 2. Shot Size
Specify whether the shot is:
– Extreme wide.
– Wide.
– Medium.
– Medium close-up.
– Close-up.
– Extreme close-up.
Shot size determines where the model allocates detail. A wide shot prioritizes body, environment, and movement. A close-up prioritizes facial detail.
Avoid asking for a distant full-body composition while also demanding microscopic skin detail unless the tool and resolution can realistically support both.
### 3. Camera Angle and Lens Logic
Define camera height and orientation: eye level, low angle, high angle, profile, over the shoulder, or three-quarter view.
Then describe the lens in practical visual terms. A wide lens emphasizes space and movement. A longer portrait lens compresses perspective and separates the face from the background.
One clear lens decision is better than a prompt containing several conflicting focal lengths.
### 4. Camera Movement
Use one primary movement in a short generated clip:
– Slow push-in.
– Lateral tracking.
– Gentle orbit.
– Tilt.
– Pan.
– Locked camera.
Complex combinations create more opportunities for distortion. If the shot includes difficult character motion, simplify the camera first.
### 5. Character Action
Describe a visible, filmable action.
“She turns toward the doorway and tightens her grip on the envelope” gives the model something concrete to animate.
“She feels betrayed by everything she believed” may help define mood, but it does not replace physical direction.
### 6. Environment and Lighting
Create a reusable description for each location. Keep its architecture, time of day, weather, color palette, and light direction consistent across shots in the same scene.
Reusing the exact environment block is often more reliable than paraphrasing it. A different description may cause the model to treat the location as a new design.
### 7. Continuity Constraints
End with a short list of what must not change:
– Same face and age.
– Same hair and wardrobe.
– Same time of day.
– No additional characters.
– No text or logos.
– No unexplained props.
Constraints should support the shot. A massive negative prompt can dilute the important instructions.
## A Reusable Prompt Template
The following structure can be adapted to tools that support image or character references:
> Use the approved character reference and preserve the exact face, hairstyle, age, eye color, and dark wool coat. Medium close-up at eye level in a three-quarter view, using portrait-lens compression and shallow depth of field. The character stands inside a nearly empty railway station at night and slowly turns toward a sound outside the frame. The camera performs a short, controlled push-in. Cool blue light enters through the windows, balanced by dim amber practical lights. Realistic cinematic texture with restrained film grain. Do not change the character’s identity, clothing, age, or proportions. Do not add people, text, logos, or new accessories.
The power of this template is not the wording. It is the separation of variables.
For the next shot, retain the identity, location, wardrobe, time, and lighting. Change only the shot size, angle, movement, and action.
## A Repeatable Workflow for Consistent AI Characters
### Stage 1: Approve the Hero Image
Generate several character concepts, then choose one production-ready image. Do not animate a design that is merely “close enough.” Small defects in the hero image will multiply across a sequence.
Save the original prompt, seed or generation identifier when available, model version, and reference file.
### Stage 2: Build the Multi-View Set
Generate the front, three-quarter, profile, and full-body views. Compare them against the hero image.
The reference set should answer a simple question: if these images appeared on a casting sheet, would a viewer immediately identify them as the same person?
### Stage 3: Design Keyframes Before Video
Create a still keyframe for every important shot before generating motion. A still image is faster and cheaper to evaluate than a finished video.
This stage catches:
– Facial drift.
– Incorrect wardrobe.
– Weak composition.
– Lighting discontinuity.
– Unwanted objects.
– Location redesign.
If the keyframe fails, fix it before animation.
### Stage 4: Generate One Short Shot at a Time
Break the sequence into editable units. A short shot with one character action and one camera move is easier to control than a long prompt describing an entire scene.
If your broader workflow includes high-volume presenter or training videos, the companion article **“The Rise of Digital Avatars: How AI Presenters are Automating Global Video Production”** explains how these assets fit into an automated content pipeline.
### Stage 5: Use the End Frame as a Bridge
When the tool supports start and end frames or reference media, use a selected frame from one shot to guide the next. This can help preserve location, pose, and lighting through the cut.
It does not eliminate the need for identity references, but it adds continuity information.
### Stage 6: Validate Before Editing
Compare the first, middle, and last frames of every shot against the identity sheet. Do not evaluate only the thumbnail.
Check:
– Face shape.
– Eyes and hairline.
– Wardrobe details.
– Hands and anatomy.
– Light direction.
– Background layout.
– Screen direction.
Screen direction matters because two individually successful shots can fail when cut together. If a character exits frame right, the next shot must preserve the intended geography.
### Stage 7: Finish in a Traditional Editing Workflow
AI generation is one production department, not the entire film.
Use editing, sound design, color correction, retiming, stabilization, and visual effects to shape the final sequence. A two-frame trim may remove an unstable transition more efficiently than regenerating the entire shot.
## Common Causes of Identity Drift
### Rewriting the Character in Every Prompt
Calling the hair “black” in one prompt and “dark brown” in another may seem harmless, but it introduces variation. Keep a fixed identity block or rely on the same reference.
### Poor Reference Images
Blur, dramatic shadow, low resolution, extreme perspective, or facial obstruction hides the information the model needs.
### Conflicting Instructions
A prompt that requests three camera moves, two visual styles, a costume change, an emotional transformation, and a crowded action scene gives the model too many priorities.
Reduce the shot to its essential decisions.
### Changing Everything at Once
If you change the location, wardrobe, lighting, angle, action, and expression in one generation, you cannot identify the source of the failure.
Change variables gradually and preserve approved prompt blocks.
### Using Too Many References
More references are not always better. If images differ in face, age, hairstyle, or costume, the model must average or choose between them.
Use a small, clean set of consistent views.
### Expecting Generation to Replace Editing
Some visual problems are better solved in post-production. A cutaway, crop, color match, speed adjustment, or short dissolve may rescue a strong performance with a minor defect.
## A Practical Shot Evaluation Scorecard
Review every shot across five dimensions.
### Identity
Would a viewer immediately recognize the character?
### Continuity
Do wardrobe, lighting, props, location, and screen direction match the surrounding shots?
### Motion and Physics
Do hands, facial movement, body weight, fabric, and interacting objects behave plausibly?
### Cinematography
Do the framing, lens, movement, and depth support the story?
### Editability
Does the shot provide clean frames at the beginning and end? Can it cut naturally with the next shot?
Identity and continuity should be non-negotiable. A spectacular camera move cannot compensate for a different face.
## Prompt Engineering as Production Design
The best cinematic prompts are not overloaded with style words. They function like compact production documents.
They define:
– Who is in the shot.
– What remains fixed.
– Where the camera is.
– What changes during the shot.
– How the scene is lit.
– What the audience should notice.
This mindset also improves collaboration. A director, designer, editor, or client can review the same blocks and identify which decision needs to change.
Prompt libraries should therefore be organized as reusable assets:
– Character identity blocks.
– Location blocks.
– Lighting setups.
– Camera movement patterns.
– Continuity constraints.
– Approved visual references.
The workflow becomes faster because the team is no longer rebuilding its visual language with every generation.
## Conclusion
AI character consistency is not achieved by describing a face more aggressively. It comes from controlling the production environment around that identity.
Build a clean character bible. Create a multi-view reference sheet. Separate fixed identity information from shot variables. Approve still keyframes before animation. Generate short shots, validate continuity, and finish the sequence with professional editing.
The most successful cinematic AI creators will not be the people who write the longest prompts. They will be the people who build the most reliable visual systems.
## Frequently Asked Questions
### How many reference images should I use for an AI character?
Start with three clear views: front, three-quarter, and profile. Add a full-body view when clothing, proportions, or action matter. Consistency between references is more important than quantity.
### Does multi-view identity locking guarantee the same face?
No method guarantees perfect identity across every model and motion. Multi-view references reduce uncertainty and improve consistency, but shots still require review.
### Should cinematic AI prompts be written in English?
It depends on the model. Test the same controlled shot in your preferred languages, then use the version that produces the most consistent result. Stable terminology and clear structure matter more than decorative language.
### Why does a character change even when I use the same reference?
Common causes include a weak reference, a prompt that conflicts with the image, an extreme camera angle, complex motion, excessive scene detail, or inconsistent reference images.
### What is the difference between a character description and an identity reference?
A character description tells the model what traits to create. An identity reference provides visual evidence of a specific approved character. For multi-shot consistency, the visual reference usually carries more reliable identity information.

2 thoughts on “Cinematic AI: Mastering Prompt Engineering and Multi-View Identity Locking”